
This article was originally published at Kite‘s blog and republished here as part of content partnership program. Kite is a plugin for your IDE that uses machine learning to give you useful code completions for Python. Available for Atom, PyCharm, Sublime, VS Code, and Vim.
Introduction
While playing one of my favorite games, MechWarrior Online, I developed a strong suspicion that their matchmaking engine drove some level of imbalance in the match outcome. With no public APIs I could use to pull the data required to test this, I started saving match score screenshots.
The screenshots contained most of the information I needed to test some basic hypotheses, such as, “Does a difference in team weights correlate with victory for the heavier team?” I just needed a way to get the data out of a picture and into something that facilitated analysis, like pandas.
The transformation required is called Optical Character Recognition (OCR). Big data in the form of images and video are exploding, making the translation of these formats to structured data a critical skill. Fortunately, Amazon has developed a pay-for-use API for OCR. This service has been quite a boon as building an accurate OCR engine is difficult for a data hobbyist.
Leveraging this API simplified the work needed to access the data embedded in my store of screenshots. OCR engines require good inputs to give good outputs, and as the saying goes, “garbage in, garbage out”. This makes image manipulation important when working with OCR tools. If the text returned from the image is incorrect, the amount of time spent on data cleaning can easily match that of manual entry, which for hundreds of screenshots can amount to dozens of hours.
Prerequisites
- Python 3 (3.7 recommended)
- An AWS Account with a configured IAM user
- A local folder with credentials and config files (see AWS instructions)
- Pillow and boto3 packages installed
- (optional) S3 Bucket for storing Image files
For more detailed information on configuring AWS, please see Kite’s Github repository. Here, you can easily access the code from this post and others in Kite’s Python series.
Balancing time and cost
With the goal of creating a usable dataset of MechWarrior game results, passing an entire image to AWS Rekognition is sub-optimal. This is due to the limit on text detection (currently set at 50 words per image), and the difficulty of cleaning and assembling the data for final analysis.
Optimization discussions about using AWS APIs require a discussion of pricing. Individual calls to the Rekognition API are inexpensive, yet can add up quickly when assembling entire datasets from images. While converting this dataset from image to text I had to choose between time and API costs.
Using an OCR API as a service was less time intensive for me than building my own OCR engine. Additionally, cutting screenshots into distinct pieces with known data categories saved significant time on data cleaning with only a moderate increase in cost.
Below are a set of examples that illustrate why it was faster, but more expensive, to segment images into individual elements before sending those images to the Rekognition API.
Converting images to structured data
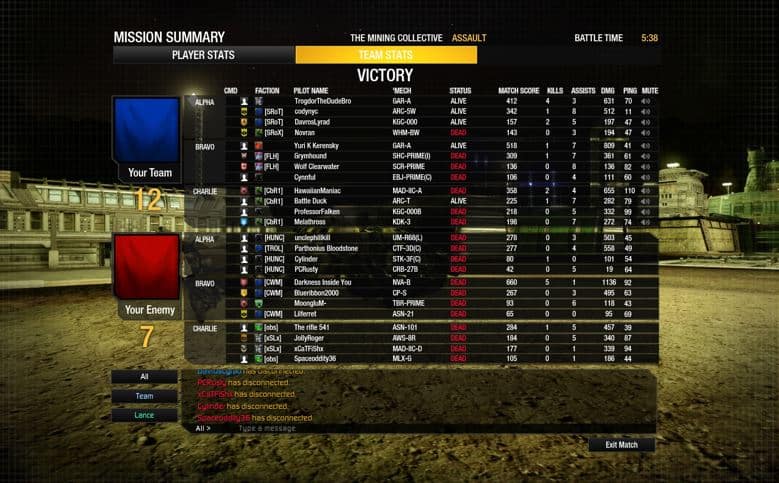
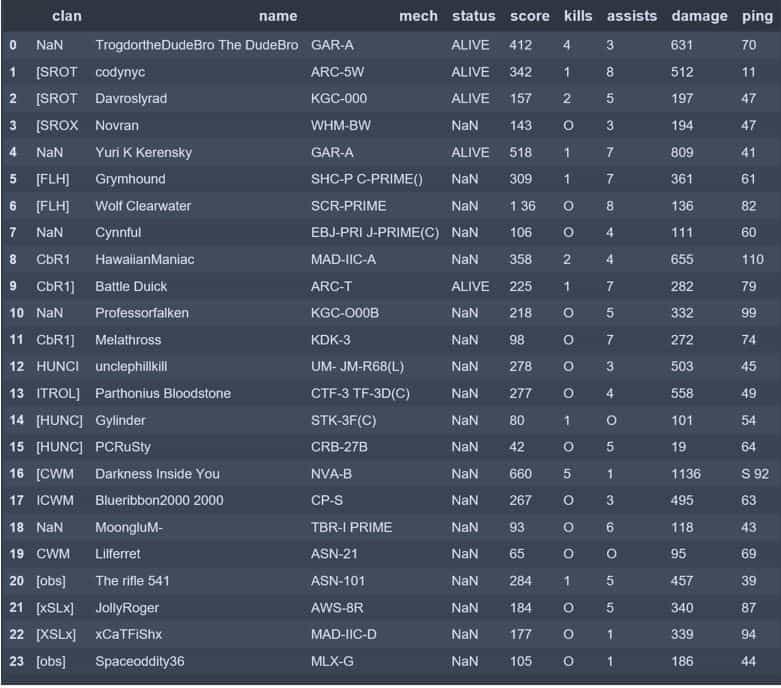
Below is an example of a match score screenshot from MechWarrior Online. The data fields of primary interest to me are:
- Faction
- Mech
- Status
- Match score
- Kills
- Assists
- Damage (DMG)
- Ping
While names have potential future value, my data sample for players is far less complete than what is available at isengrim.
The screenshot below was the standard match result display until April 2019. The discussion and associated code will only consider screenshots of this type.
Converting images to byte arrays for S3
The Rekognition API has a few limitations on use. The tool is set up to work very well with S3 buckets. Using data stores other than S3 requires some additional work. Specifically, images must be sent to the API as a byte array. The function below converts an image loaded to a byte array.
```
def convert_to_byte_array(img):
	"""
	Converts an image file to a byte array for use with the
	Rekognition API
	"""
	img_byte_arr = io.BytesIO()
	img.save(img_byte_arr, format='PNG')
	img_byte_arr = img_byte_arr.getvalue()
	return img_byte_arr
```Note: if the image files are stored in an S3 bucket, conversion to byte arrays is not necessary.
The Rekognition API returns a JSON package that is a list of Python dictionaries. Each detection has data for the bounding box and confidence level. Each line read from an image is stored as both a line response and individual words with metadata that links each word to the parent line.
From the Rekognition API docs:
“A word is one or more ISO basic Latin script characters that aren’t separated by spaces. DetectText can detect up to 50 words in an image.
A line is a string of equally spaced words. A line isn’t necessarily a complete sentence…A line ends when there is no aligned text after it. Also, a line ends when there’s a large gap between words…”
A few considerations for optimizing OCR API usage:
- Words per image: the API only returns results for the first 50 words in an image. This limit requires that text heavy images such as the above screenshot need to be split into small parts.
- Data errors: the API returns are not 100% accurate. This can manifest as missing data, incorrect translation from image to text, or additional text created from visual noise.
- Logical groupings: cutting an image such that it contains data of like type can reduce the time spent handling data errors.
When slicing the screenshot, I tried two approaches:
- Horizontal slicing with one row per player
- A combination of horizontal and vertical slicing to create one image per data element
Both methods allowed the removal of unwanted information such as the “MISSION SUMMARY” and “VICTORY” text (the winning team is always the first 12 rows). Overall, I am most pleased with the combination of vertical and horizontal slicing as sending and receiving single text elements was easier to clean. In the future, I may attempt a column split as the data returns are more homogenous.
Horizontal slicing method
A horizontal row for a single player looks like this:

The code block below loads the image slice, converts it to a byte array, and sends it to the Rekognition API.
```
horizontal_slice = Image.open("../data/test_data/horizontal_slice_1.jpg")
horizontal_slice_arr = convert_to_byte_array(horizontal_slice)
horizontal_slice_ocr_resp = client.detect_text(Image={"Bytes":horizontal_slice_arr})
```
The full OCR response for a single row looks like this. The below sample is the first element of the returned JSON object.
```
{
	"TextDetections": [{
		"DetectedText": "[SR0T",
		"Type": "LINE",
		"Id": 0,
		"Confidence": 90.60694885253906,
		"Geometry": {
			"BoundingBox": {
				"Width": 0.056441716849803925,
				"Height": 0.8399999737739563,
				"Left": 0.003680981695652008,
				"Top": 0.0
			},
			"Polygon": [{
				"X": 0.003680981695652008,
				"Y": 0.0
			}, {
				"X": 0.06012269854545593,
				"Y": 0.0
			}, {
				"X": 0.06012269854545593,
				"Y": 0.8399999737739563
			}, {
				"X": 0.003680981695652008,
				"Y": 0.8399999737739563
			}]
		}
	}
```
Parsing the OCR JSON return for each line results in the following:
Line results:
```
[SR0T
codynyc ARC-5W ALIVE 342 1 8 512 11
```
Word results:
SR0T
codynyc
ARC-5W
ALIVE
342
1
8
512
11
The line return breaks on large spacing between words which results in multiple text lines being returned from a single horizontal row image. This makes the word returns from the API more useful.
The text detection only missed the closing square bracket on the clan column. This is a great return.
Passing the data to pandas for analysis may be simple or complex. See modules in the /log directory to see some data classes for producing DataFrames, or feel free to write your own:
You can check out Kite’s Github repository to easily access the code from this post and others from their Python series.
The DataFrame constructed using horizontal image slices:
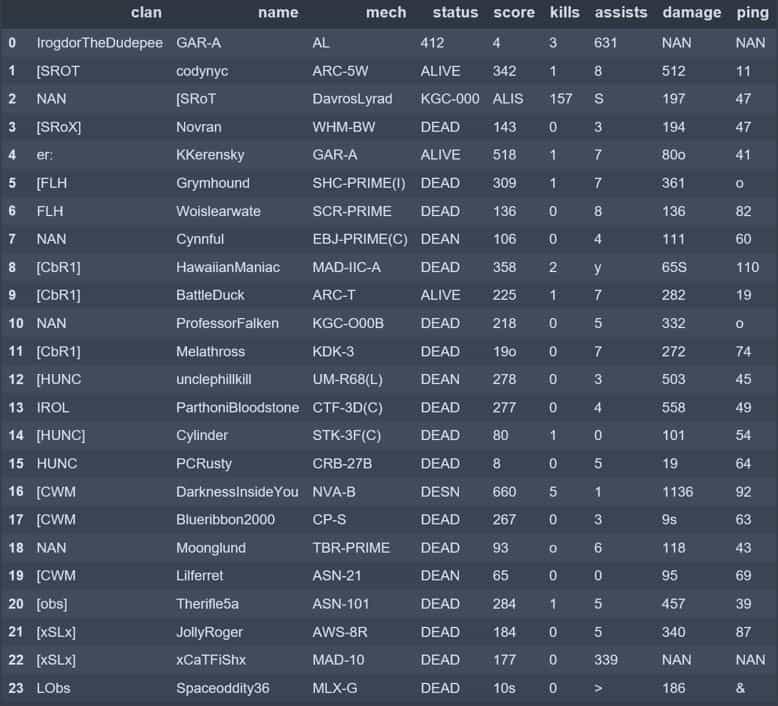
Constructing a full DataFrame of all 24 player rows with high data quality is difficult when sending nine data elements in a single image. The inconsistent formatting of player names, presence (or absence) of a clan, and distortion due to OCR all contribute to poor quality data.
Two types of errors occurred when getting returns from horizontal slices: too few items in the returned word list or too many. In the DataFrame above, one row is right-shifted by one column which creates incompatible data types in the status and score columns as well as overwriting the kills data point with the score data point. These problems can all be handled with post-OCR data manipulation.
If the return list was missing a single entry, I used the naive approach of assuming that if a clan is not returned, then it’s blank and should be filed with a null (NAN) value. This approach works in most cases, but fails to catch the one outlined above which, if not corrected, will lead to bad returns in the status and mech columns and a large distortion in kills.
For lists with more than nine elements, I made the assumption (based on checking multiple returns) that this was most often because a player name included spaces which were recognized as separate words. In these cases I combined several list elements to form a single player name.
When the return list had more than one missing field, I padded the end with NAN values to alert myself that I was missing critical data. This is the worst case as it requires checking the source image to correctly populate the data, which kind of defeats the purpose of the OCR API.
The complications (read added time) in handling these data errors led me to examine some additional image manipulation prior to calling the API. Two commonly used methods are thresholding (threshing) and resizing. Thresholding converts an image to grayscale and then converts all pixels to white or black based on a brightness threshold.
```
def grey_min_max(img, min_grey=185):
	"""
	Converts all pixels with brightness < min_grey to black
	Converts all pixels with brightness >= to white
	"""
	img = img.convert("L")
	img_px = img.load()
	for i in range(img.size[1]):
		for j in range(img.size[0]):
			if img_px[j,i] < min_grey:
				img_px[j,i] = 0
			else:
				img_px[j,i] = 255
	return img
```
Resizing, as the name implies, changes the size of an image. When resizing, care must be taken to preserve the aspect ratio, otherwise text can be distorted. The function below manages resizing for both x and y axes while preserving aspect ratio.
```
def resize_image(self, img, mode="width", new_base=300, print_size=False):
	"""
	Resizes an image while maintaining aspect ratio
	new_width is the new width of the image in pixels
	height will be set based on the aspect ratio and the passed width parameter
	"""
	if mode == "width":
		#get new width as a percent of old width for aspect ratio
		width_pct = (new_base / float(img.size[0]))
		#get new height based on new/old width percentage
		new_height = int((float(img.size[1])*float(width_pct)))
		#resize image: AWS OCR needs minimum of 80x80 pixels
		img = img.resize((new_base, new_height), Image.ANTIALIAS)
		if print_size:
			print("new size", img.size)
		return img

	elif mode == "height":
		height_pct = (new_base / float(img.size[1]))
		new_width = int((float(img.size[0])*float(height_pct)))
		img = img.resize((new_width, new_base), Image.ANTIALIAS)
		if print_size:
			print("new size", img.size)
		return img
```
Applying these functions to a horizontal image slice is similar to broadcasting the function across a row in a DataFrame: all the elements are affected whether they needed the function or not. This produced inconsistent results when combined with OCR; some rows had better returns, others worse.
DataFrame from horizontal slices that were resized then threshed:
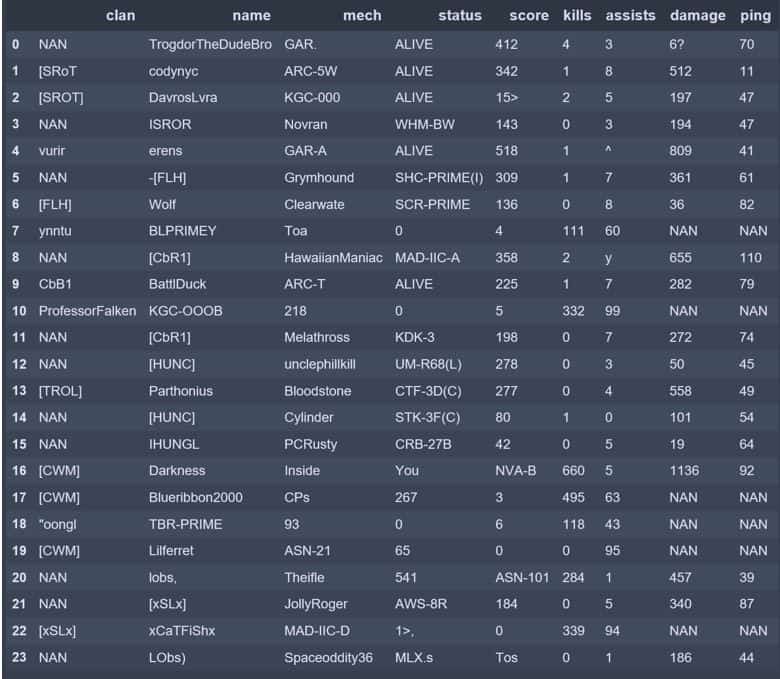
The returns from the resized and threshed image were actually worse. Likely there are ways to address this with more advanced image manipulation techniques or trial and error to find better resize and threshold values, but I am more interested in analyzing the data. I decided more image cutting was a better solution and proceeded to cut the image into individual data cells.
Vertical and horizontal slicing combined
Splitting into a 9 x 24 matrix increased cost and processing time which I considered a worthwhile trade for not having to manually correct for missing and incorrect data. Resizing each image cell was required: Rekognition requires a minimum 80 x 80 pixel density.
Getting OCR returns for individual data cells allowed me to control positioning. When I got a null return, I knew to which data element it related. The DataFrame below is a marked improvement over the horizontal slicing method.
DataFrame from a fully sectioned screenshot (no image threshing)
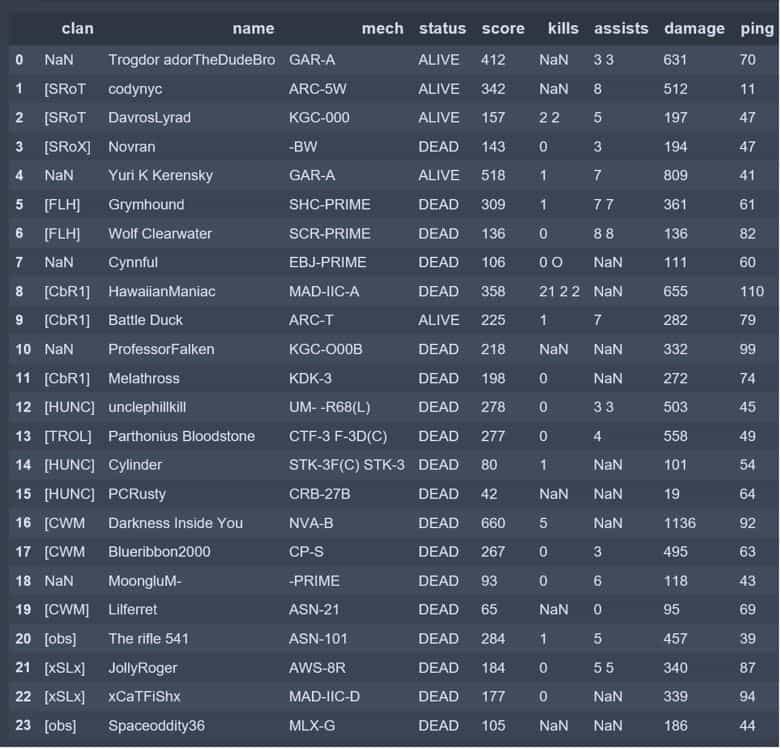
When threshing, I was able to select which columns would be threshed. In the DataFrame below, the “status” column has many NaN values as the threshing converted all the red pixels to black. Threshing other columns fixed a significant number of errors leaving patterns that are more easily corrected. Mapping cleaning functions over columns with similar error patterns is preferable to comparing image to text data.
DataFrame with image sharpening before sending to API for OCR:
Splitting screenshots into data cells prior to sending the images to the OCR API returned far better results than only cutting the image horizontally. With a few cleaning functions, I will be able to correct the data errors present in this example.